Charmeleon Pokemon: 20 facts about Charmeleon The Pokemon

0

Ladies and gentlemen, may I present to you the fiery feline of fury: Charmeleon! This hotheaded Pokémon is not for the faint of heart, with its fierce and aggressive nature and powerful flames. With its tough and durable scales, Charmeleon is a formidable opponent in battle.

Just try not to get burned by its devastating fire attacks! And if you’re lucky, you may even get to witness the majestic transformation as Charmeleon evolves into the mighty Charizard. But beware, this prideful Pokémon can be quite arrogant at times. So if you’re ready for a wild ride, give Charmeleon a try!

  1. Charmeleon is the evolved form of Charmander and evolves into Charizard.
  2. Charmeleon has a flame on the tip of its tail that is used to intimidate its enemies and can be used as a light source in dark areas.
  3. Charmeleon has the ability to control fire and can use powerful fire-based attacks such as Flamethrower and Fire Blast.
  4. In the Pokémon anime, Charmeleon is known for its hot temper and tendency to get easily angry.
  5. In Pokémon Red and Blue, Charmeleon could only be obtained by evolving a Charmander that had reached level 16.
  6. In Pokémon X and Y, Charmeleon can be caught in the wild in the Kalos region.
  7. In Pokémon Sun and Moon, Charmeleon can be found in the Alola region’s Route 3 and Mount Lanakila.
  8. Charmeleon’s design is based on a chameleon, a type of reptile known for its ability to change the color of its skin.
  9. Charmeleon’s Japanese name is “Lizardo,” which is a combination of “lizard” and “doragon,” the Japanese word for dragon.
  10. In the Pokémon games, Charmeleon has high attack and special attack stats, making it a strong physical and special attacker.
  11. Charmeleon can learn the move Dragon Claw, a powerful physical attack that deals damage with sharp claws made of dragon energy.
  12. Charmeleon’s high attack and special attack stats, along with its ability to learn a variety of fire-based moves, make it a popular choice for competitive battling.
  13. In Pokémon Stadium, Charmeleon has the unique ability to use a move called Rage, which increases its attack power every time it takes damage.
  14. In Pokémon Mystery Dungeon: Red Rescue Team and Blue Rescue Team, Charmeleon is a rare recruit that can be found in the game’s dungeons.
  15. In Pokémon GO, Charmeleon can be evolved from Charmander by catching enough Charmander and accumulating enough candy.
  16. In the Pokémon anime, Ash Ketchum’s Charmander evolved into a Charmeleon and later a Charizard.
  17. In the Pokémon manga series, Charmeleon is featured as one of the main Pokémon owned by the character Red.
  18. Charmeleon has appeared in various Pokémon merchandise, including trading cards, toys, and clothing.
  19. Charmeleon has a Mega Evolution form in Pokémon X and Y called Mega Charizard X, which has a different appearance and increased stats.
  20. Charmeleon has a Gigantamax form in Pokémon Sword and Shield, which is a larger and more powerful version of the Pokémon with unique moves and abilities.

Tags: charmeleon pokemon, charmeleon pokemon facts, charmeleon

Uncovering the Fascinating World of Super Mario Mushrooms: Power-ups and Beyond

0

Ah, the Super Mario Mushroom – a beloved and iconic part of the Super Mario universe. Now, we all know that Mario loves his mushrooms. This little mushroom has been helping Mario on his adventures for decades, granting him extra lives and powers along the way. But what is it about this mushroom that makes it so special? Is it the way it bounces around, evading Mario’s grasp? Or is it the way it transforms him into a giant, unstoppable force?

In the Super Mario video game series, mushrooms are items that can be collected by the player and have various effects. The most well-known type of mushroom is the Super Mushroom, which gives Mario an extra hit point and allows him to break blocks from below when he is in his Super form.

You see, when Mario eats a mushroom, he’s not just getting a boost of strength or size. He’s also getting a huge surge of confidence. Suddenly, he feels like he can take on the world (or at least the next level of the game). And who wouldn’t want a little extra confidence in their lives?

But let’s not forget about the other kinds of mushrooms in the Mario universe. In the Super Mario series, there are a few different types of Super Mushrooms that Mario can encounter on his adventures. These include:

  1. The Super Mushroom: This is the classic Super Mushroom, which is red with white spots and grants Mario an extra life when he collects it.
  2. The 1-Up Mushroom: This mushroom looks similar to the Super Mushroom, but it has a green stem and grants Mario an extra life when he collects it.
  3. The Poison Mushroom: This mushroom looks similar to the Super Mushroom, but it is black with white spots and will harm Mario if he touches it.
  4. The Super Leaf: This item is not a mushroom, but it is worth mentioning because it grants Mario the ability to transform into a raccoon or tanooki, giving him the ability to fly and attack enemies with his tail.

    Uncovering the Fascinating World of Super Mario Mushrooms: Power-ups and Beyond
    Img src – Google Image
  5. The Super Star: This item is also not a mushroom, but it grants Mario invincibility for a short period of time, allowing him to run through enemies and obstacles without taking damage.
  6. The Mega Mushroom: This giant mushroom grants Mario the ability to transform into a giant, invulnerable version of himself, allowing him to crush enemies and destroy obstacles with ease.
  7. The Mini Mushroom: This small mushroom grants Mario the ability to shrink down to a tiny size, allowing him to access small spaces and reach hidden areas.
  8. Super Leaf: The Super Leaf gives Mario a raccoon tail and the ability to fly and glide, similar to the Cape Feather.
  9. Fire Flowers: When Mario collects a Fire Flower, he gains the ability to shoot fireballs at enemies.
  10. Cape Feathers: Cape Feathers give Mario a cape, allowing him to fly and glide through levels.
  11. Super Bell: This mushroom, introduced in the game “Super Mario 3D World,” gives Mario a cat suit and the ability to climb walls and scratch enemies with his claws.
  12. Super Hammer: This mushroom allows Mario to break certain blocks and defeat certain enemies by swinging a hammer.
  13. Super Acorn: This mushroom, introduced in the game “Super Mario 3D World,” gives Mario a squirrel suit and the ability to glide through the air and cling to walls.S
  14. uper Carrot: This mushroom, introduced in the game “Super Mario RPG: Legend of the Seven Stars,” allows Mario to turn into a rabbit and attack enemies with powerful hops.

These various mushrooms and power-ups can greatly enhance Mario’s abilities and help him on his quest to rescue Princess Peach and save the Mushroom Kingdom.

So the next time you see a mushroom in a Mario game, don’t hesitate – chow down and let the good times roll! And if you’re feeling really adventurous, you can always try eating a real-life mushroom and see if it gives you any of Mario’s special powers (but please be careful, as some types of mushrooms can be poisonous).

Ampana: A Tropical Paradise for Your Next Vacation

0

If you’re looking for a unique destination that offers a range of activities and experiences, then Ampana in Central Sulawesi, Indonesia, is the perfect place for you! This beautiful and vibrant city is a great place for both first-time and experienced travelers to explore.

Ampana, located near the center of the Togian Islands, is one of the most popular tourist destinations in Indonesia. The city is surrounded by crystal-clear waters, white-sand beaches, and lush green hills, making it a stunning backdrop for your vacation. There are plenty of activities to keep you busy, including snorkeling, diving, fishing, and kayaking in the surrounding waters.

For those interested in history and culture, Ampana has plenty to offer. The city is filled with ancient temples and traditional villages, which provide a unique insight into the local culture and history. The nearby Togian Islands are a great place to explore traditional fishing villages and learn more about the local lifestyle.

Ampana is also a great place to shop and eat. Here, you can find a variety of local products and delicacies, ranging from traditional snacks to handmade souvenirs. There are also plenty of restaurants and bars to choose from, so you can find something to suit every taste and budget.

When it comes to activities, Ampana has something for everyone. Whether lounging on the beach or exploring the city’s many attractions, you’ll be sure to find something to keep you entertained. It is also a great place to relax and unwind, with its laid-back atmosphere and friendly locals.

How to get to Ampana?

To get there, you can fly into the Ampana Airport (AMQ) or take a boat from Sulawesi’s major port cities. Once you have arrived in Ampana, you can get around by renting a car or taking a taxi. If you are looking for a more scenic way to explore the city, you can also rent a motorbike or bicycle.

Things to know before going to Ampana

  1. Language: The official language of Indonesia is Indonesian, but you may find that many people in Ampana also speak local languages such as Makassar, Bugis, and Tojo. It may be helpful to learn some basic phrases in Indonesian before your visit.
  2. Culture: Ampana is home to a diverse population with a rich cultural heritage. It is important to be respectful of local customs and traditions, including dressing modestly, removing shoes before entering someone’s home, and avoiding public displays of affection.
  3. Climate: Ampana has a tropical climate with high humidity and temperatures averaging around 27°C (80°F) year-round. Be sure to bring lightweight, breathable clothing and sunscreen.
  4. Transportation: The town of Ampana is served by the Ampana Airport, which has regular flights to major cities in Indonesia. Taxis and motorbike taxis are widely available for getting around the town.
  5. Safety: It is generally considered a safe place to visit, but it is always a good idea to be aware of your surroundings and take necessary precautions to protect yourself and your belongings.
  6. What to do: Ampana is surrounded by beautiful natural landscapes and offers a range of outdoor activities such as snorkeling, diving, and hiking. The town also has several cultural and historical landmarks worth visiting, including the Palace of the Tojo Una-Una Regency and the Tojo Una-Una Museum.

Ampana is a great destination for both first-time and experienced travelers. With its stunning natural beauty and many attractions, you’re sure to have a great time exploring this vibrant city. So, if you’re looking for a unique destination that’s sure to leave a lasting impression, then it’s time to plan your trip to Ampana!

12 Raised Garden Bed Design Ideas

A raised garden bed is like a little slice of heaven on earth. It elevates your plants above the mundane, allowing them to bask in the sun and soak up all the nutrients they need to thrive. Plus, with a raised bed, you won’t have to bend down as far to tend to your precious greens, saving your back and knees from unnecessary strain. So why not elevate your gardening game and give your plants the royal treatment they deserve with a raised garden bed?

In this article, we’ll explore 12 raised garden bed design ideas to inspire and guide you in creating the perfect garden bed for your space. We’ll cover a wide range of designs, including traditional, modern, and creative options.

Traditional Wood-raised garden bed

12 Raised garden bed design ideas

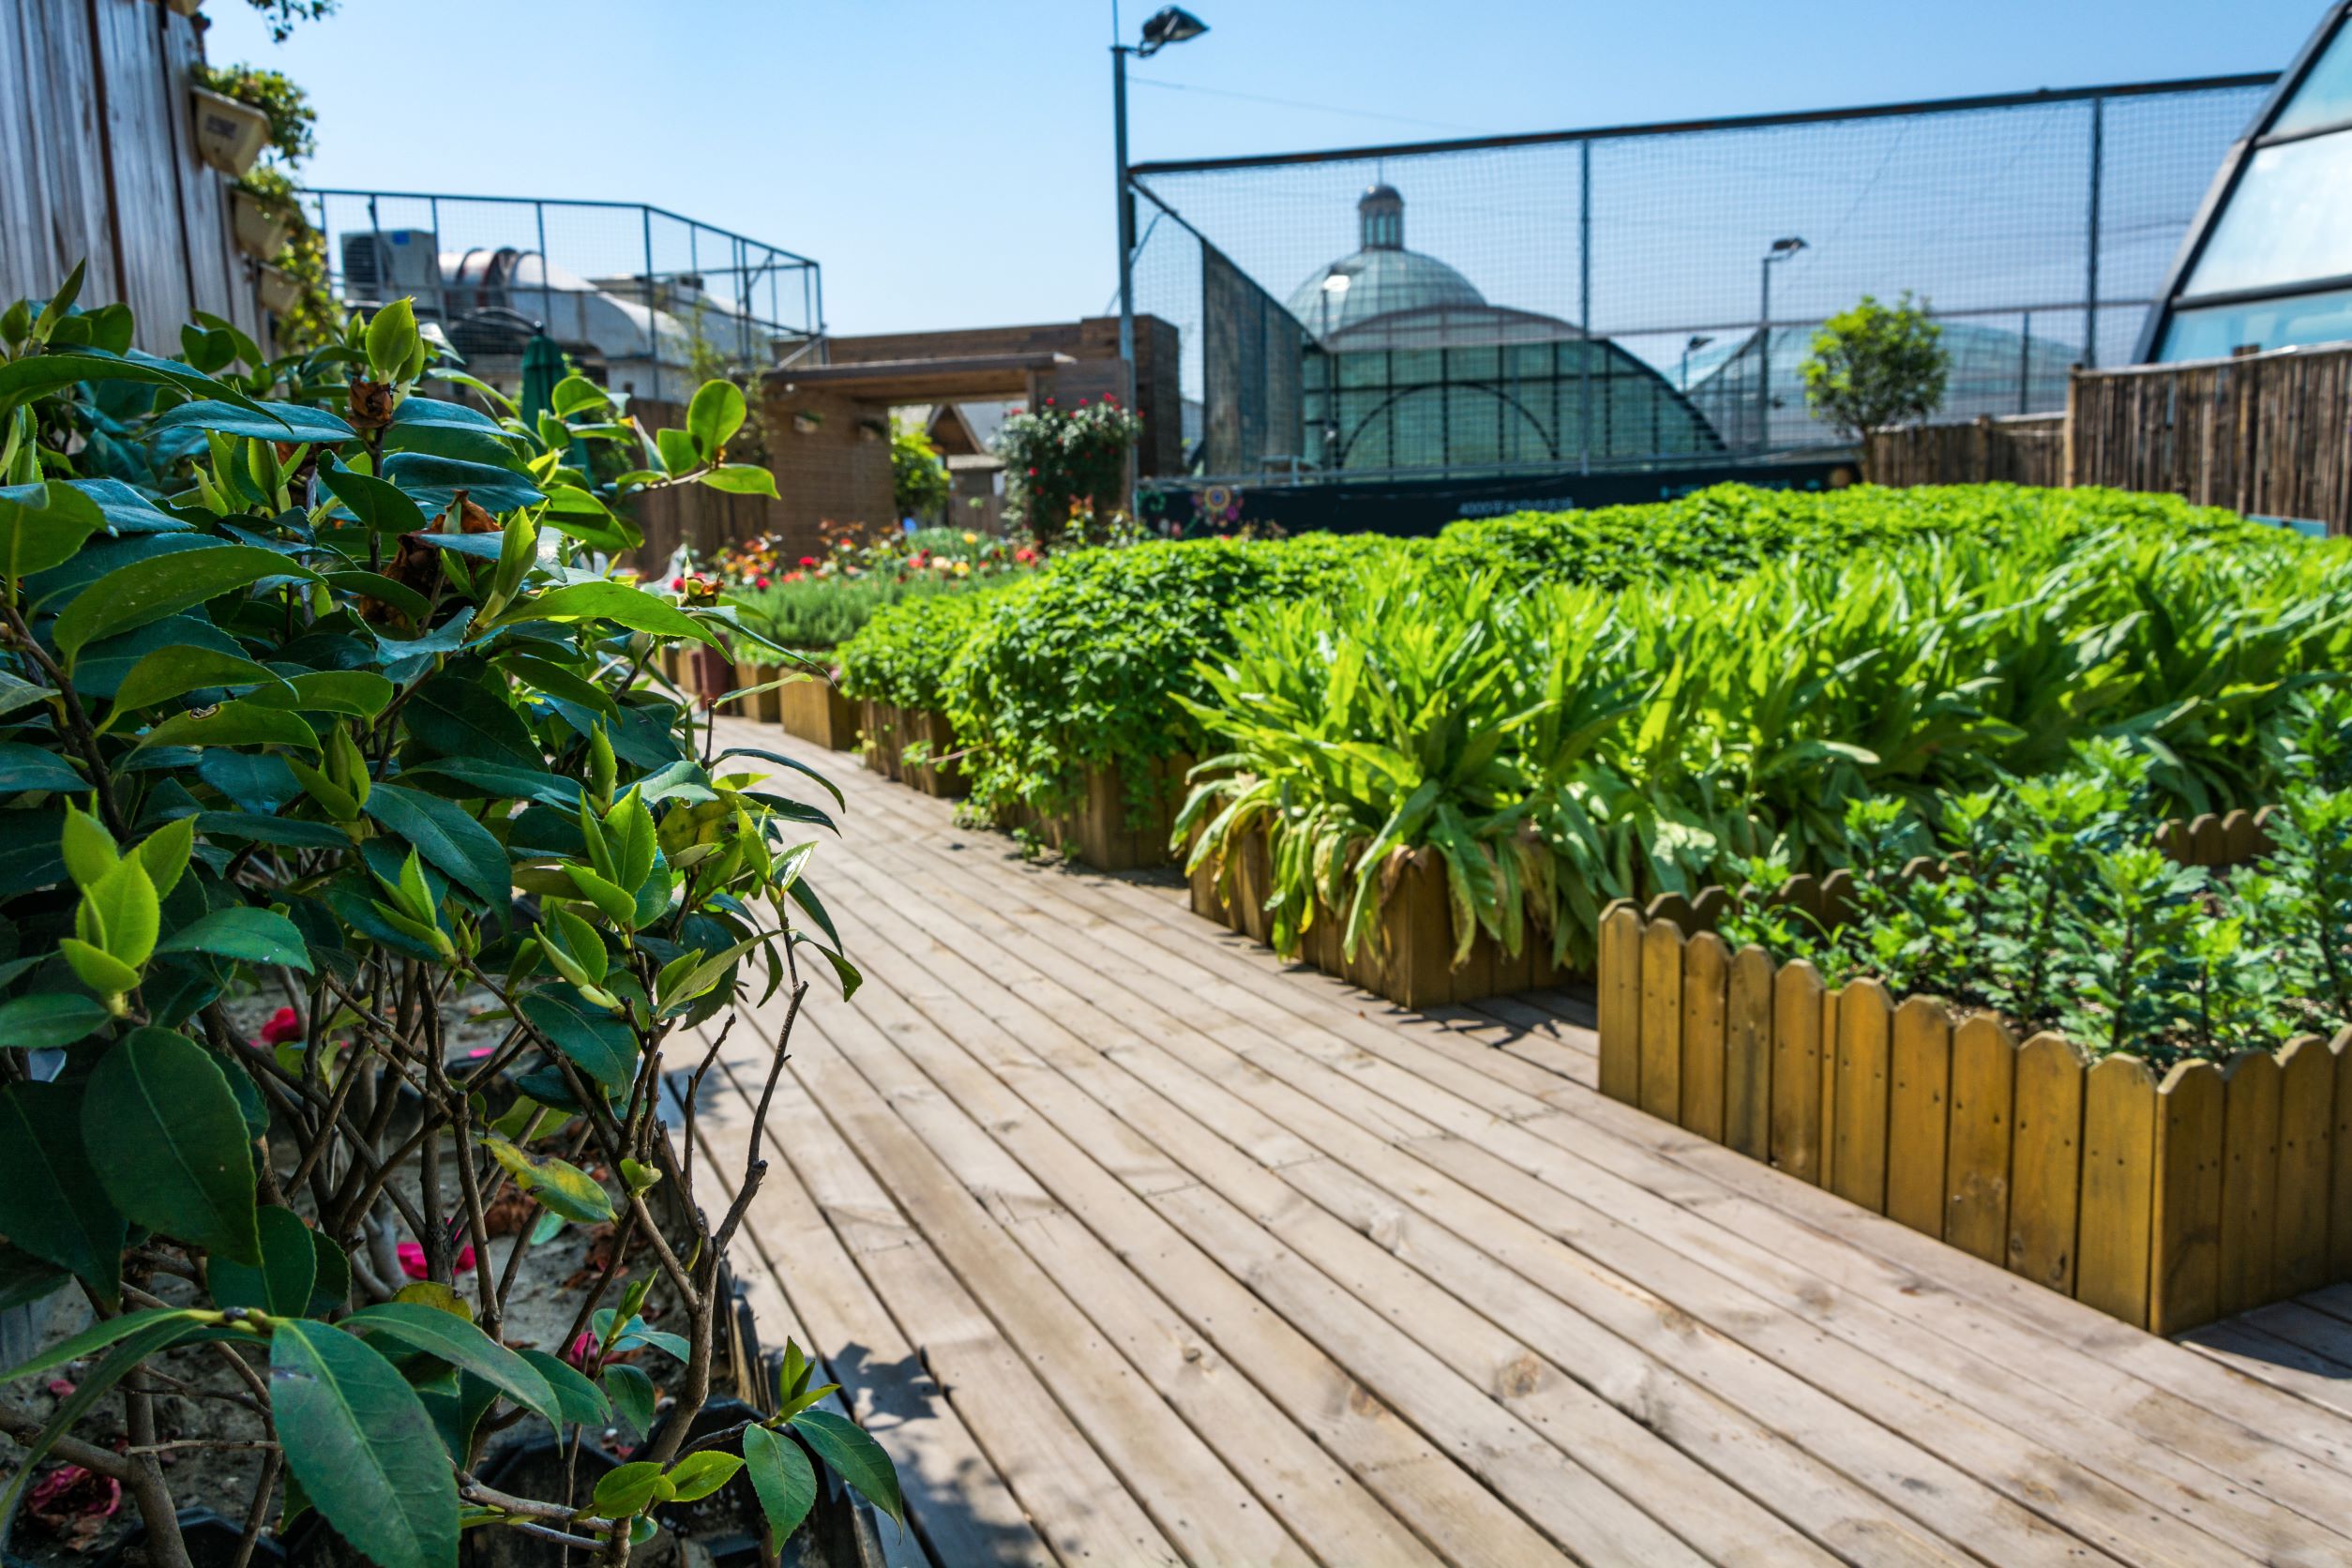
One of the most popular and classic raised garden bed designs is a simple wooden frame. These can be made from a variety of materials, including cedar, redwood, and pressure-treated lumber. They are easy to build and relatively inexpensive, making them a great option for beginner gardeners.

One benefit of wooden raised garden beds is that they can be easily modified and customized to fit your specific needs. You can choose the size, shape, and height of your garden bed to fit your space and plant preferences.

Stone or Brick-raised Garden Bed

12 Raised garden bed design ideas

If you want a more permanent and durable option, a stone or brick-raised garden bed might be the way to go. These materials are much more resistant to rot and decay than wood, and they can add a beautiful and elegant touch to your garden.

However, keep in mind that these materials can be more expensive and difficult to work with. You may need to hire a professional or have access to specialized tools to properly construct a stone or brick-raised garden bed.

  • Metal-raised garden bed12 Raised garden bed design ideas

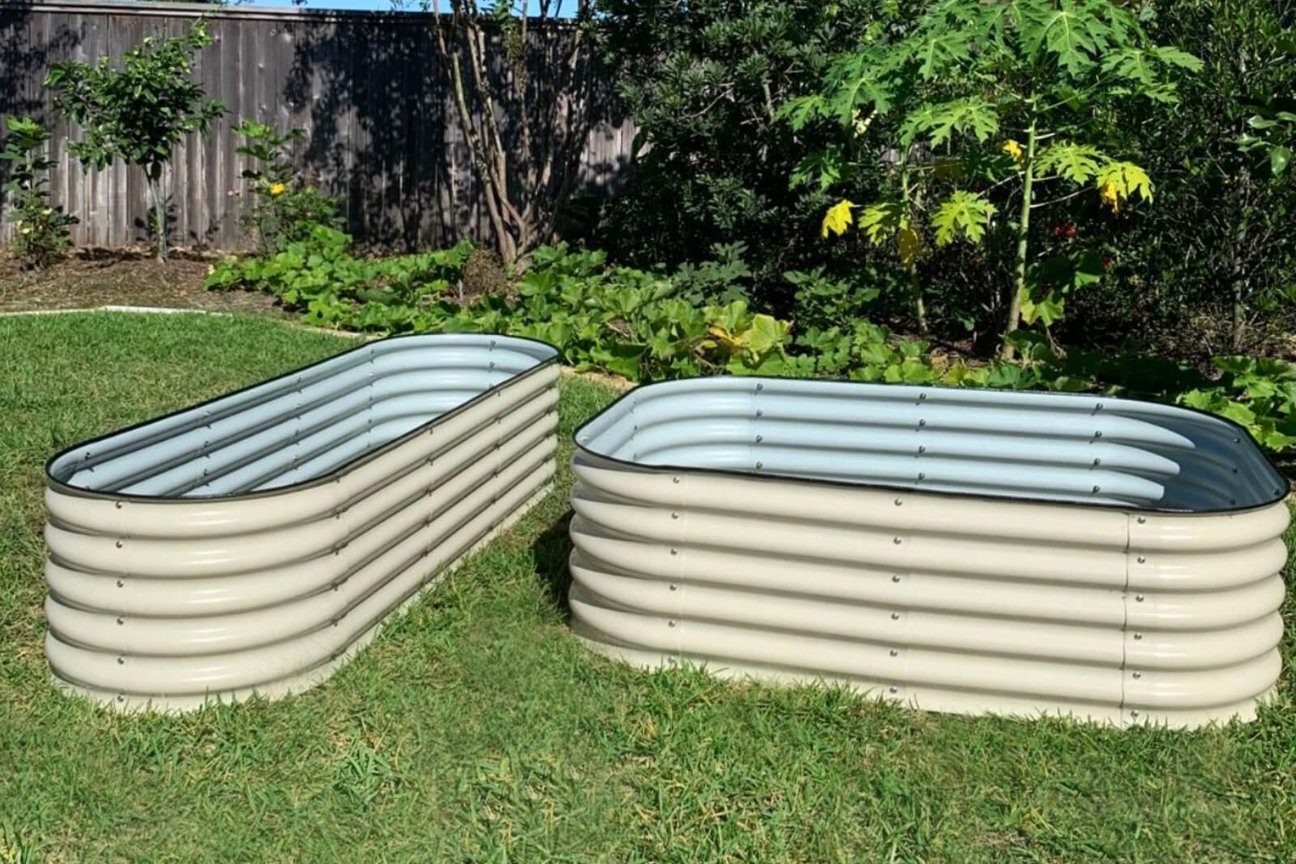
Metal-raised garden beds are another durable and long-lasting option. They are often made from galvanized steel or aluminum, which are both resistant to rust and corrosion.

One advantage of metal raised garden beds is that they are relatively lightweight and easy to move around. This can be helpful if you need to rearrange your garden bed or change its location. However, keep in mind that metal can conduct heat, so it may not be the best choice for plants that require cooler soil temperatures.

  • Concrete raised garden bed12 Raised garden bed design ideas

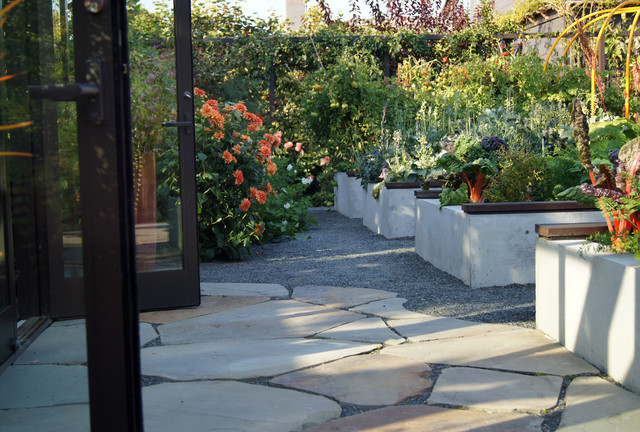
Concrete raised garden beds are a more permanent and heavier option. They are often made from concrete blocks or poured concrete, and they are extremely durable and resistant to damage.

One benefit of concrete raised garden beds is that they can be molded into any shape or size, allowing for maximum flexibility and customization. However, keep in mind that concrete can be expensive and difficult to work with, so it may not be the best choice for beginner gardeners.

  • Composite wood raised garden bed12 Raised garden bed design ideas

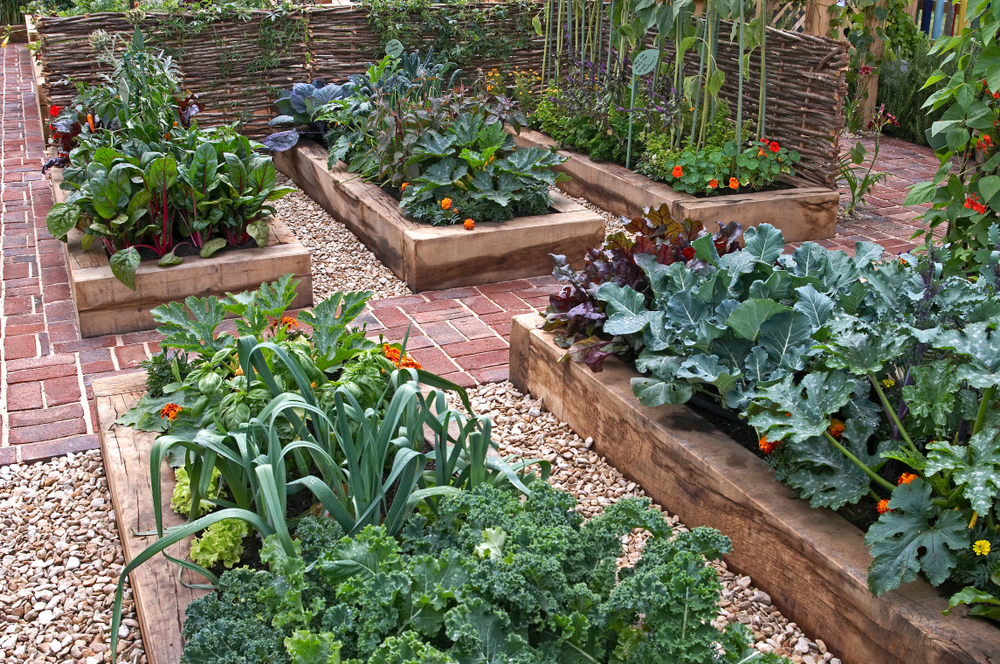
Composite wood-raised garden beds are a newer and increasingly popular option. They are made from a mixture of wood and plastic, which makes them resistant to rot and decay.

One benefit of composite wood-raised garden beds is that they are relatively low maintenance and easy to work with. They are also often more affordable than traditional wood-raised garden beds. However, keep in mind that they may not be as durable as some of the other options on this list.

  • Recycled materials raised garden bed12 Raised garden bed design ideas

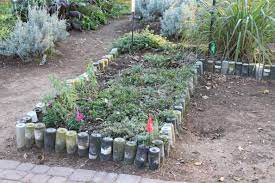
If you’re looking for an eco-friendly and budget-friendly option, a raised garden bed made from recycled materials might be the way to go. There are many materials you can use, including old pallets, tires, and even wine barrels.

One benefit of using recycled materials for your raised garden bed is that you can often find these materials for free or at a low cost. However, keep in mind that recycled materials may not be as durable as other options , and they may require more maintenance. You’ll also need to make sure the materials are safe and suitable for growing plants.

  • Vertical raised garden bed12 Raised garden bed design ideas

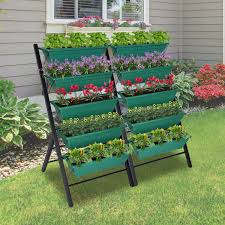
If you have limited space or want to add some interest to your garden, a vertical raised garden bed might be the way to go. These beds are designed to be stacked or mounted on a wall, allowing you to grow plants in a vertical direction.

Vertical raised garden beds are often made from wood or metal, and they can be customized with shelving or pockets for planting. One benefit of these beds is that they allow you to maximize your space and grow a variety of plants in a small area. However, keep in mind that they may require more watering and maintenance than traditional raised garden beds.

  • Pallet raised garden bed12 Raised garden bed design ideas

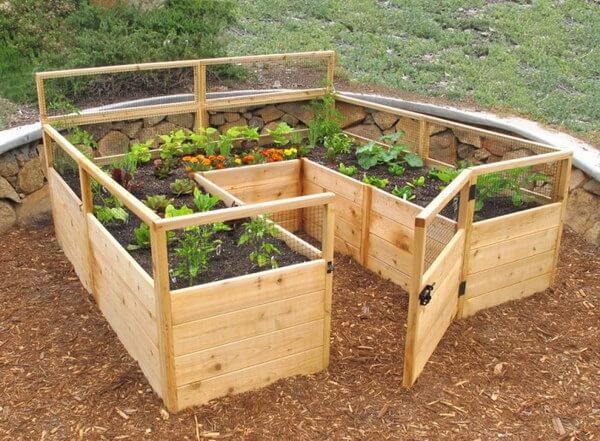
Pallet-raised garden beds are a popular and budget-friendly option for beginner gardeners. They are made from recycled pallets, which can often be found for free or at a low cost.

One benefit of pallet-raised garden beds is that they are easy to assemble and customize. You can simply stack the pallets and fill them with soil and plants. However, keep in mind that pallets may not be as durable as other materials, and they may require more maintenance. You’ll also need to make sure the pallets are safe and suitable for growing plants.

  • Stackable raised garden bed12 Raised garden bed design ideas

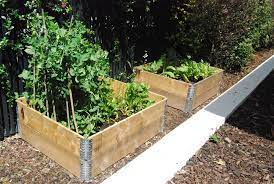
Stackable raised garden beds are a great option for those who want to grow a variety of plants in a small space. These beds are designed to be stacked on top of each other, allowing you to grow plants in multiple layers.

Stackable raised garden beds are often made from wood or metal, and they can be customized with shelving or pockets for planting. One benefit of these beds is that they allow you to maximize your space and grow a variety of plants in a small area. However, keep in mind that they may require more watering and maintenance than traditional raised garden beds.

  • Corner raised garden bed12 Raised garden bed design ideas

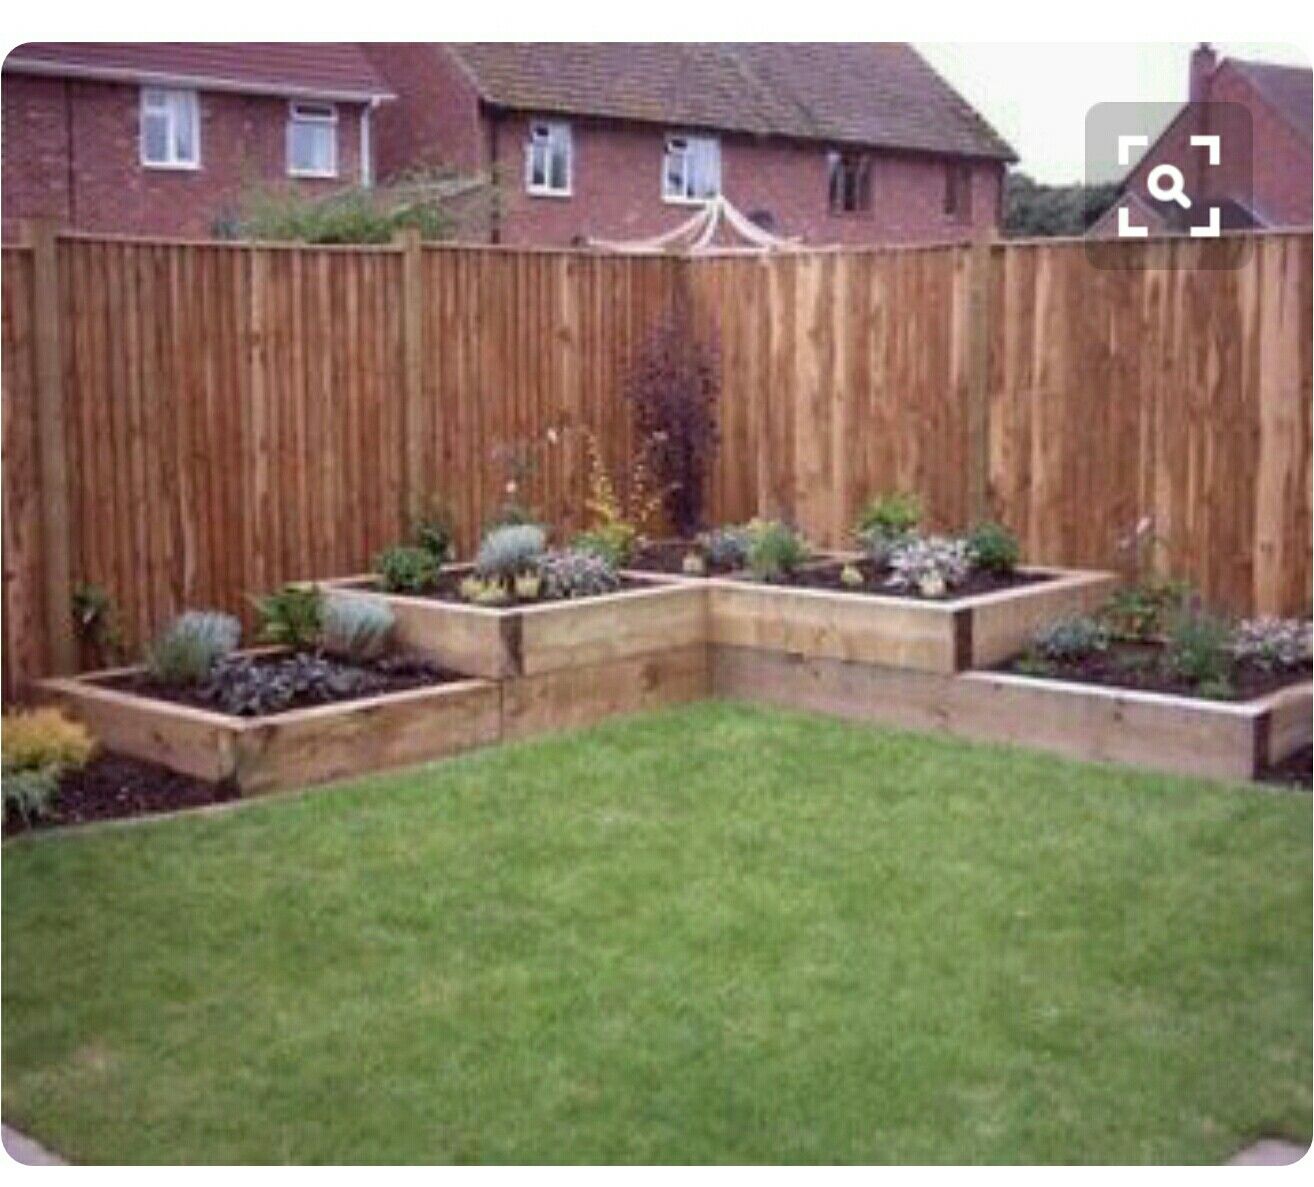
If you have an unused corner in your yard, a corner-raised garden bed might be the perfect solution. These beds are designed to fit into a corner, allowing you to make use of otherwise unused space.

Corner-raised garden beds can be made from a variety of materials including wood, stone, and metal. One benefit of these beds is that they can add a beautiful and functional element to your garden. However, keep in mind that they may require more planning and consideration when it comes to plant placement and watering.

  • Tiered raised garden bed12 Raised garden bed design ideas

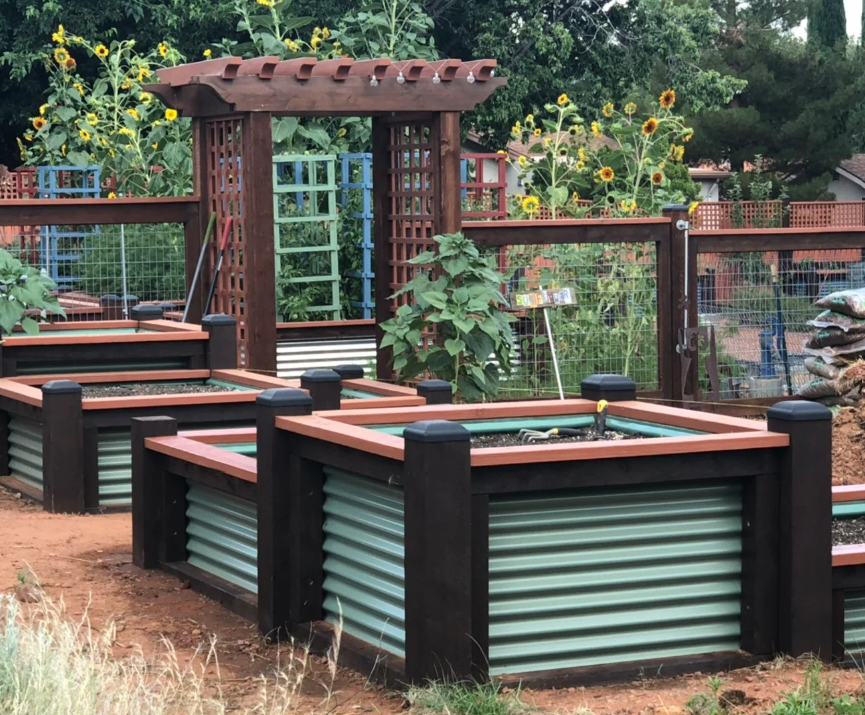
Tiered raised garden beds are a great option for those who want to grow a variety of plants in a small space. These beds are designed with multiple levels or tiers, allowing you to grow plants in multiple layers.

Tiered raised garden beds can be made from a variety of materials including wood, stone, and metal. One benefit of these beds is that they allow you to maximize your space and grow a variety of plants in a small area. However, keep in mind that they may require more watering and maintenance than traditional raised garden beds.

  • Modular raised garden bed12 Raised garden bed design ideas

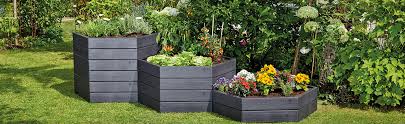
Modular raised garden beds are a great option for those who want to customize their garden bed to fit their specific needs. These beds are made up of individual modules or blocks that can be stacked and arranged in a variety of configurations.

Modular raised garden beds can be made from a variety of materials including wood, stone, and metal. One benefit of these beds is that they allow you to easily modify and expand your garden bed as your plant needs change. However, keep in mind that they may require more planning.

A Step-by-Step Guide to Making Homemade Lemon Ice Cream

0

As the sun sets on a warm summer evening, there is nothing more inviting than the cool, creamy embrace of lemon ice cream. With its bright, zesty flavor and rich, velvety texture, this frozen treat is the perfect way to end a perfect day.

As you take your first spoonful, the tangy citrus flavor dances across your tongue, tantalizing your taste buds with its fresh, invigorating taste. With every bite, you are transported to a world of pure, romantic indulgence, where the only thing that matters is the moment you are in.Whether you enjoy it on its own or as a topping for your favorite desserts, our lemon ice cream is sure to satisfy your cravings for something fresh and delicious. So sit back, relax, and savor every bite of this heavenly frozen treat!

To make homemade lemon ice cream, you will need the following ingredients:

  • 2 cups heavy cream
  • 1 cup whole milk
  • 3/4 cup granulated sugar
  • 4 egg yolks
  • 1/2 cup lemon juice
  • 2 tablespoons lemon zest

You will also need an ice cream maker and a container to store the finished ice cream in the freezer.

Here are the steps to make lemon ice cream:

  1. In a medium saucepan, combine the cream, milk, and sugar. Cook over medium heat, stirring constantly, until the sugar has dissolved.
  2. In a separate bowl, whisk together the egg yolks. Slowly pour the hot cream mixture into the egg yolks, whisking constantly to prevent the eggs from cooking.
  3. Return the mixture to the saucepan and cook over medium heat, stirring constantly, until it thickens slightly and coats the back of a spoon. This should take about 5-7 minutes.
  4. Remove the mixture from the heat and stir in the lemon juice and zest. Cover the mixture and refrigerate until chilled, at least 2 hours or overnight.
  5. Once the mixture is chilled, churn it in an ice cream maker according to the manufacturer’s instructions. This will typically take about 20-30 minutes.
  6. Once the ice cream has reached the desired consistency, transfer it to a container and freeze until firm, about 2 hours.
  7. Once the ice cream is firm, it is ready to be served. You can scoop it into bowls or cones, or use it as a topping for other desserts. Enjoy!

Homemade Lemon Ice Cream for Vegetarians (without egg)

Ingredients:

  • 2 cups heavy cream
  • 1 cup whole milk
  • 3/4 cup granulated sugar
  • Zest of 2 lemons (use a microplane or fine grater to remove the zest from the lemon skin)
  • 1/2 cup lemon juice (about 3-4 lemons)
  • Pinch of salt

Instructions:

  1. In a medium saucepan, combine the cream, milk, sugar, lemon zest, and salt. Place the pan over medium heat and stir the mixture occasionally until the sugar has dissolved. This should take about 5-7 minutes.
  2. While the mixture is heating, use a lemon juicer or squeeze the lemons by hand to extract the juice. Measure out 1/2 cup of lemon juice and set it aside.
  3. Once the sugar has dissolved, remove the pan from the heat and let it cool to room temperature. This can take about 30 minutes to an hour, depending on the size of your pan and the temperature of your kitchen. You can speed up the cooling process by placing the pan in an ice bath (a large bowl filled with ice water).
  4. Once the mixture has cooled, cover the pan with plastic wrap and place it in the refrigerator for at least 2 hours or overnight. This step is important because it allows the flavors to meld and the mixture to chill completely.
  5. After the mixture has chilled, pour it into the bowl of an ice cream maker and churn according to the manufacturer’s instructions. This typically takes 20-30 minutes, depending on the machine.
  6. Once the ice cream has reached a soft-serve consistency, transfer it to an airtight container and freeze for at least 2 hours or until firm. This will give the ice cream a creamy, scoopable texture.
  7. When you’re ready to serve the ice cream, scoop it into bowls or cones and enjoy! You can also add toppings such as whipped cream, sprinkles, or chopped nuts for an extra touch of decadence.

Note: If you don’t have an ice cream maker, you can still make lemon ice cream by freezing the mixture in a shallow container and stirring it every 30 minutes until it reaches the desired consistency. This will take longer than using an ice cream maker, but it is still possible to make homemade ice cream without one.

Feel free to adjust the amount of sugar and lemon juice to suit your taste. You can also add a splash of lemon liqueur or a pinch of lemon zest to the mixture for an extra burst of flavor. Experiment and have fun with this recipe!

Sipping Margaritas and Soaking Up the Sun in La Paz, Mexico

0

Dreaming of traveling to La Paz, Mexico is like dreaming of a tropical paradise with endless adventures and cultural experiences. From the crystal clear waters of the Sea of Cortez to the charming streets of the historic city center, La Paz promises to be a dream come true for any wanderlust-filled traveler. So pack your bags, grab your sunscreen, and get ready for an unforgettable adventure in La Paz, Mexico!

Some facts about La Paz

La Paz is the capital city of the Mexican state of Baja California Sur, located on the southern tip of the Baja California Peninsula. With a population of around 220,000, La Paz is a vibrant and lively city with a rich history and culture. The area has a long and varied history, with evidence of human habitation dating back thousands of years.

The first Europeans to visit the area were the Spanish, who arrived in the 16th century. The city was founded in 1535 by Hernán Cortés and was originally called La Paz de Nuestra Señora de La Paz (The Peace of Our Lady of Peace). It served as the capital of the state of Baja California Sur until 1973, when it was moved to Mexicali.

Throughout its history, La Paz has been influenced by a number of different cultures, including indigenous groups, Spanish colonists, and more recently, tourists from around the world. Today, the city is a melting pot of cultures and traditions, with a vibrant and diverse population.

Why should you travel to La Paz, Mexico?

There are many reasons why someone might choose to travel to La Paz, Mexico. Some of the top reasons include:

  1. Beautiful beaches: La Paz is known for its beautiful beaches, which offer a variety of water sports and other recreational activities.Sipping Margaritas and Soaking Up the Sun in La Paz, Mexico
  2. Cultural attractions: The city has a rich cultural heritage and a number of museums, galleries, and other cultural attractions to explore.Sipping Margaritas and Soaking Up the Sun in La Paz, Mexico
  3. Outdoor activities: There are several national parks and natural reserves in the surrounding area, which offer opportunities for hiking, birdwatching, and other outdoor activities.Sipping Margaritas and Soaking Up the Sun in La Paz, Mexico
  4. Whale watching: La Paz is a popular destination for whale watching, as gray whales migrate through the area each year.Sipping Margaritas and Soaking Up the Sun in La Paz, Mexico
  5. Affordable: La Paz is generally more affordable than other popular tourist destinations in Mexico, making it a good choice for travelers on a budget.Sipping Margaritas and Soaking Up the Sun in La Paz, Mexico

Main attractions in La Paz

One of the main attractions in La Paz is the Malecón, a promenade that runs along the city’s waterfront. The Malecón is a popular spot for locals and tourists alike, and it is lined with restaurants, bars, and shops. There are also several parks and green spaces along the Malecón, making it a great place to relax and enjoy the beauty of the city.

Another popular attraction in La Paz is the Parque Nacional Constitución, a large park located in the heart of the city. The park is home to a wide variety of plants and animals, and it is a great place to go for a hike or to have a picnic. There are also several cultural events and festivals held in the park throughout the year.

In addition to its natural beauty, La Paz is also home to a number of cultural and historical sites. The Cathedral of Our Lady of La Paz is a beautiful Catholic church located in the center of the city, and the Church of Our Lady of Guadalupe is another popular place of worship. The Museum of Anthropology and History is also located in La Paz, and it houses a collection of artifacts and exhibits that showcase the history and culture of the region.

If you’re looking to experience the local culture, there are several markets and street fairs held in La Paz throughout the year. The Mercado Centro is a popular market where you can find a wide variety of goods, including fresh produce, handmade crafts, and local artwork. The Mercado Municipal is another popular market, and it is known for its seafood and traditional Mexican dishes.Sipping Margaritas and Soaking Up the Sun in La Paz, Mexico

La Paz is also a popular destination for outdoor enthusiasts, with a number of activities to enjoy in the surrounding area. The city is located on the Sea of Cortez, and it is known for its excellent fishing and scuba diving. There are also several beaches in the area, including Playa Balandra and Playa Tecolote, which are popular for swimming and sunbathing.

La Paz is a beautiful and culturally rich city with something for everyone to enjoy. Whether you’re interested in outdoor activities, cultural attractions, or just soaking up the local atmosphere, La Paz has something to offer.Sipping Margaritas and Soaking Up the Sun in La Paz, Mexico

How to get to La Paz, Mexico

  • By Air

    The closest airport to La Paz is the Manuel Márquez de León International Airport (LAP). There are several airlines that offer direct flights to La Paz from major cities in Mexico such as Mexico City, Cancun, and Guadalajara.

  • By Bus

    There are several bus companies that offer regular services from major cities in Mexico to La Paz. The journey can take anywhere from 6-12 hours depending on the starting location.

  • By Car

    La Paz is located about a 5-hour drive from Los Cabos, which is a popular destination for travelers. If you are driving from the United States, you will need to cross the border at Tijuana or San Diego and then take the Transpeninsular Highway (Highway 1) to La Paz.

Once you arrive in La Paz, you can get around the city by taxi or by using the local bus system. There are also several car rental agencies in the city if you prefer to have your own transportation.

If you’re planning to spend four days in La Paz on vacation, you’ll have plenty of time to experience all that the city has to offer. Here are a few ideas for how you could spend your time in La Paz:

Day 1:

  • Start your day by exploring the Malecón, La Paz’s waterfront promenade. Take a leisurely walk along the boardwalk, stopping to browse the shops and restaurants along the way.Sipping Margaritas and Soaking Up the Sun in La Paz, Mexico
  • In the afternoon, visit the Parque Nacional Constitución, a large park located in the heart of the city. The park is home to a wide variety of plants and animals, and it is a great place to go for a hike or to have a picnic.Sipping Margaritas and Soaking Up the Sun in La Paz, Mexico
  • In the evening, head to the Mercado Centro, a popular market where you can find a wide variety of goods, including fresh produce, handmade crafts, and local artwork.Sipping Margaritas and Soaking Up the Sun in La Paz, Mexico

Day 2:

  • Start your day by visiting the Cathedral of Our Lady of La Paz, a beautiful Catholic church located in the center of the city.Sipping Margaritas and Soaking Up the Sun in La Paz, Mexico
  • In the afternoon, take a trip to one of the beaches in the area, such as Playa Balandra or Playa Tecolote. These beaches are popular for swimming and sunbathing, and they offer stunning views of the Sea of Cortez.Sipping Margaritas and Soaking Up the Sun in La Paz, Mexico
  • In the evening, dine at one of La Paz’s seafood restaurants, which are known for their fresh and delicious seafood.Sipping Margaritas and Soaking Up the Sun in La Paz, Mexico

Day 3:

  • Spend the morning exploring the Museum of Anthropology and History, which houses a collection of artifacts and exhibits that showcase the history and culture of the region.Sipping Margaritas and Soaking Up the Sun in La Paz, Mexico
  • In the afternoon, go on a fishing or scuba diving trip in the Sea of Cortez. La Paz is known for its excellent fishing and scuba diving, and there are several companies that offer these types of tours.Sipping Margaritas and Soaking Up the Sun in La Paz, Mexico
  • In the evening, attend a cultural event or festival in the city, such as a traditional dance performance or a local music concert.Sipping Margaritas and Soaking Up the Sun in La Paz, Mexico

Day 4:

  • Spend the morning visiting one of the local street fairs or markets, such as the Mercado Municipal, which is known for its seafood and traditional Mexican dishes.Sipping Margaritas and Soaking Up the Sun in La Paz, Mexico
  • In the afternoon, take a trip to one of the nearby natural attractions, such as the Sierra de La Laguna Biosphere Reserve, which is home to a wide variety of plants and animals.Sipping Margaritas and Soaking Up the Sun in La Paz, Mexico
  • In the evening, enjoy a sunset dinner at one of the restaurants along the Malecón, and take in the beautiful views of the city and the sea.Sipping Margaritas and Soaking Up the Sun in La Paz, Mexico

La Paz offers a wide variety of activities and attractions, so you’ll have no shortage of things to do during your four-day vacation. Whether you’re interested in cultural events, outdoor activities, or just soaking up the local atmosphere, you’ll find something to enjoy in La Paz Mexico.

A World of Yellow: A Guide to the Many Things That Are Yellow

0

Did you know that the color yellow is often associated with happiness and sunshine? It’s no surprise that it’s such a popular color! But there’s more to the vibrant hue than just its sunny disposition. Here are some fun facts about yellow that you might not have known:

  1. Yellow is the color of caution. In many countries, yellow is used as a warning color, often on caution signs and traffic lights. So next time you see a yellow sign, be sure to take extra care!
  2. Yellow is the color of cowardice. In medieval times, yellow was often associated with cowardice and cowardliness. The expression “yellow-bellied” means someone is afraid or cowardly.
  3. Yellow is the color of royalty. In ancient Egypt, yellow was the color of the sun god, Ra, and was reserved for Pharaohs and their families. In fact, Cleopatra is said to have used a crushed mineral called “yellow earth” as a beauty treatment to give her skin a golden glow. In fact, the word “yellow” comes from the Old English word “geolu,” which means “yellow.”
  4. Yellow is the color of jealousy. It’s no coincidence that the phrase “green with envy” is used to describe someone who is jealous. Yellow and green are often associated with feelings of jealousy and envy.
  5. But yellow isn’t all doom and gloom. It’s also the color of creativity and intellectual energy. Some famous yellow lovers include Vincent van Gogh, who famously painted “Sunflowers,” and Albert Einstein, who was known for his love of yellow notepads.
  6. Yellow is the color of bananas. Bananas are one of the few fruits that are naturally yellow when they are ripe. They are also one of the most popular fruits in the world, with over 100 billion bananas eaten every year.
  7. Yellow is the color of lemons. Lemons are another yellow fruit that are often used in cooking and baking. They are also a popular choice for making refreshing drinks like lemonade.
  8. Some people have a strong dislike for the color yellow, a condition known as “yellowophobia.”
  9. The yellow pigment found in plants is called xanthophyll.
  10. The flowers of many plants, including daffodils and sunflowers, are yellow due to the presence of xanthophylls.things that are yellow
  11. The color yellow is often used in safety equipment and clothing, as it is highly visible and can help to prevent accidents.
  12. Yellow is the color of the sun. The sun is the source of all life on Earth and is often depicted as being yellow in artwork and literature. It’s no wonder that the color yellow is often associated with warmth and happiness.
  13. But beware! Too much yellow can also have negative effects. It’s been known to cause feelings of frustration and anger, and can even lead to physical symptoms like dizziness and nausea. So be sure to use it sparingly, and maybe avoid painting your entire bedroom yellow (unless you’re looking for a wild ride).
  14. The expression “yellow journalism” refers to sensational and unethical journalism practices, often characterized by the use of yellow ink in newspaper printing.


So there you have it! A few fun facts about the vibrant and cheerful color yellow. Whether you’re a fan of sunny days, bananas, or daffodils, there’s no denying that yellow is a bright and cheerful color that brings joy to our lives. Happy yellow-ing!


Fried Chicken Breast: 6 Delicious and Versatile Recipes for Any Time of Day

0

Fried chicken breast is a classic and beloved dish that is enjoyed by many people around the world. There’s something about the crispy, golden-brown exterior and the juicy, flavorful meat that makes it a favorite for so many. Whether you’re making it at home or ordering it at a restaurant, fried chicken breast is always a satisfying and delicious option. Plus, with so many different ways to prepare and serve it, there’s something for everyone’s taste. Whether you like it spicy, savory, or sweet, there’s a fried chicken breast recipe out there for you. So go ahead and indulge in your love for this delicious dish – you won’t be disappointed!

1. Fried Chicken Breast Sandwich

Ingredients:

  • 2 chicken breasts, pounded to an even thickness
  • 1 cup all-purpose flour
  • 2 eggs, beaten
  • 1 cup breadcrumbs
  • Salt and pepper, to taste
  • Oil, for frying
  • 4 hamburger buns
  • Mayo, lettuce, tomato, and pickles, for toppings

Instructions:

  1. Preheat a deep fryer or large pot filled with oil to 350°F.
  2. In a shallow dish, combine the flour, salt, and pepper. In another shallow dish, beat the eggs. In a third shallow dish, mix the breadcrumbs with a pinch of salt and pepper.
  3. Dip each chicken breast in the flour mixture, then the egg mixture, and finally the breadcrumb mixture, making sure to coat each piece evenly.
  4. Carefully place the chicken breasts in the hot oil and fry for about 5-7 minutes on each side, or until the breading is golden brown and the chicken is cooked through.
  5. Remove the chicken from the oil and place on a paper towel-lined plate to drain any excess oil.
  6. Assemble the sandwiches by spreading mayo on each bun, placing a piece of chicken on the bottom bun, and topping with lettuce, tomato, and pickles.
  7. Close the sandwiches with the top buns and serve immediately.

fried-chicken-sandwich


2. Fried Chicken Breast Alfredo Pasta

Ingredients:

  • 2 chicken breasts, pounded to an even thickness
  • 1 cup all-purpose flour
  • 2 eggs, beaten
  • 1 cup breadcrumbs
  • Salt and pepper, to taste
  • Oil, for frying
  • 1 pound pasta
  • 2 cups heavy cream
  • 1 cup grated Parmesan cheese
  • Chopped parsley, for garnish

Instructions:

  1. Preheat a deep fryer or large pot filled with oil to 350°F.
  2. In a shallow dish, combine the flour, salt, and pepper. In another shallow dish, beat the eggs. In a third shallow dish, mix the breadcrumbs with a pinch of salt and pepper.
  3. Dip each chicken breast in the flour mixture, then the egg mixture, and finally the breadcrumb mixture, making sure to coat each piece evenly.
  4. Carefully place the chicken breasts in the hot oil and fry for about 5-7 minutes on each side, or until the breading is golden brown and the chicken is cooked through.
  5. Remove the chicken from the oil and place on a paper towel-lined plate to drain any excess oil. Cut the chicken into bite-sized pieces.
  6. Bring a large pot of salted water to a boil and cook the pasta according to the package instructions. Drain and set aside.
  7. In a large saucepan, heat the heavy cream over medium heat until it begins to steam. Gradually stir in the Parmesan cheese, stirring until the cheese is fully melted and the sauce is smooth.
  8. Add the cooked pasta and chicken pieces to the Alfredo sauce and toss to coat.
  9. Serve the pasta in bowls, garnished with chopped parsley.

Chicken-Alfredo-Pasta

3. Fried Chicken Breast and Waffles

Ingredients:

  • 2 chicken breasts, pounded to an even thickness
  • 1 cup all-purpose flour
  • 2 eggs, beaten
  • 1 cup breadcrumbs
  • Salt and pepper, to taste
  • Oil, for frying
  • 2 cups all-purpose flour
  • 2 teaspoons baking powder
  • 1 teaspoon salt
  • 1 cup milk
  • 2 eggs, beaten
  • 4 tablespoons melted butter
  • Maple syrup, for serving

Instructions:

  1. Preheat a deep fryer or large pot filled with oil to 350°F.
  2. In a shallow dish, combine the flour, salt, and pepper. In another shallow dish, beat the eggs. In a third shallow dish, mix the breadcrumbs with a pinch of salt and pepper.
  3. Dip each chicken breast in the flour mixture, then the egg mixture, and finally the breadcrumb mixture, making sure to coat each piece evenly.
  4. Carefully place the chicken breasts in the hot oil and fry for about 5-7 minutes on each side, or until the breading is golden brown and the chicken is cooked through.
  5. Remove the chicken from the oil and place on a paper towel-lined plate to drain any excess oil.
  6. In a large mixing bowl, whisk together the flour, baking powder, and salt. In a separate bowl, whisk together the milk, eggs, and melted butter.
  7. Pour the wet mixture into the dry mixture and stir until just combined.
  8. Heat a waffle iron and pour a ladleful of the batter into the center of the iron. Close the iron and cook the waffles until golden brown, about 5-7 minutes. Repeat with the remaining batter.
  9. Serve the waffles topped with a fried chicken breast and a drizzle of maple syrup.

fried-chicken-waffles

4. Fried Chicken Breast and Biscuit Pot Pie

Ingredients:

  • 2 chicken breasts, pounded to an even thickness
  • 1 cup all-purpose flour
  • 2 eggs, beaten
  • 1 cup breadcrumbs
  • Salt and pepper, to taste
  • Oil, for frying
  • 1 cup all-purpose flour
  • 1 tablespoon baking powder
  • 1 teaspoon salt
  • 6 tablespoons cold butter, cut into small pieces
  • 3/4 cup milk
  • 1 cup frozen mixed vegetables
  • 1 cup chicken broth
  • 1/2 cup heavy cream
  • Salt and pepper, to taste

Instructions:

  1. Preheat a deep fryer or large pot filled with oil to 350°F.
  2. In a shallow dish, combine the flour, salt, and pepper. In another shallow dish, beat the eggs. In a third shallow dish, mix the breadcrumbs with a pinch of salt and pepper.
  3. Dip each chicken breast in the flour mixture, then the egg mixture, and finally the breadcrumb mixture, making sure to coat each piece evenly.
  4. Carefully place the chicken breasts in the hot oil and fry for about 5-7 minutes on each side, or until the breading is golden brown and the chicken is cooked through.
  5. Remove the chicken from the oil and place on a paper towel-lined plate to drain any excess oil. Cut the chicken into bite-sized pieces.
  6. Preheat the oven to 425°F.
  7. In a large mixing bowl, whisk together the flour, baking powder, and salt. Cut in the butter with a pastry cutter or your fingers until the mixture resembles coarse crumbs. Add the milk and stir until a soft dough forms.
  8. On a lightly floured surface, roll out the biscuit dough to about 1/2 inch thickness. Cut into small circles using a biscuit cutter or the rim of a glass.
  9. In a large saucepan, bring the chicken broth to a boil. Add the frozen vegetables and cooked chicken pieces and stir to combine.
  10. In a small bowl, whisk together the heavy cream and a pinch of salt and pepper. Pour into the saucepan and stir until the sauce thickens slightly.
  11. Pour the chicken and vegetable mixture into a baking dish and top with the biscuit dough circles.
  12. Bake for 20-25 minutes, or until the biscuits are golden brown and the filling is bubbly.

Biscuit-Chicken-Pot-Pie-Recipe

5. Fried Chicken Breast and Mashed Potato Bowl

Ingredients:

  • 2 chicken breasts, pounded to an even thickness
  • 1 cup all-purpose flour
  • 2 eggs, beaten
  • 1 cup breadcrumbs
  • Salt and pepper, to taste
  • Oil, for frying
  • 2 pounds potatoes, peeled and quartered
  • 1/2 cup milk
  • 4 tablespoons butter
  • Salt and pepper, to taste
  • 1 cup frozen mixed vegetables
  • 1 cup gravy (store-bought or homemade)

Instructions:

  1. Preheat a deep fryer or large pot filled with oil to 350°F.
  2. In a shallow dish, combine the flour, salt, and pepper. In another shallow dish, beat the eggs. In a third shallow dish, mix the breadcrumbs with a pinch of salt and pepper.
  3. Dip each chicken breast in the flour mixture, then the egg mixture, and finally the breadcrumb mixture, making sure to coat each piece evenly.
  4. Carefully place the chicken breasts in the hot oil and fry for about 5-7 minutes on each side, or until the breading is golden brown and the chicken is cooked through.
  5. Remove the chicken from the oil and place on a paper towel-lined plate to drain any excess oil. Cut the chicken into bite-sized pieces.
  6. In a large pot, bring salted water to a boil and add the potatoes. Cook until tender, about 15-20 minutes.
  7. Drain the potatoes and return them to the pot. Mash the potatoes with the milk, butter, salt, and pepper until smooth.
  8. In a separate pan, cook the frozen vegetables according to the package instructions.
  9. To assemble the bowls, divide the mashed potatoes between 4 bowls. Top each with a piece of fried chicken, cooked vegetables, and a drizzle of gravy.

chicken-mashed-potato-bowl

6. Fried Chicken Breast and Coleslaw Salad

Ingredients:

  • 2 chicken breasts, pounded to an even thickness
  • 1 cup all-purpose flour
  • 2 eggs, beaten
  • 1 cup breadcrumbs
  • Salt and pepper, to taste
  • Oil, for frying
  • 1 head green cabbage, finely shredded
  • 1 cup mayonnaise
  • 2 tablespoons apple cider vinegar
  • 2 tablespoons sugar
  • 1 teaspoon celery seeds
  • Salt and pepper, to taste

Instructions:

  1. Preheat a deep fryer or large pot filled with oil to 350°F.
  2. In a shallow dish, combine the flour, salt, and pepper. In another shallow dish, beat the eggs. In a third shallow dish, mix the breadcrumbs with a pinch of salt and pepper.
  3. Dip each chicken breast in the flour mixture, then the egg mixture, and finally the breadcrumb mixture, making sure to coat each piece evenly.
  4. Carefully place the chicken breasts in the hot oil and fry for about 5-7 minutes on each side, or until the breading is golden brown and the chicken is cooked through.
  5. Remove the chicken from the oil and place on a paper towel-lined plate to drain any excess oil. Cut the chicken into bite-sized pieces.
  6. In a large bowl, mix together the cabbage, mayonnaise, apple cider vinegar, sugar, celery seeds, salt, and pepper until the cabbage is well coated.
  7. Divide the coleslaw between 4 bowls and top each with a piece of fried chicken.

fried-chicken-breast-coleslaw-salad

Serve immediately and enjoy!


The Mysterious Yellow Watermelon: Uncovering the Truth Behind Its Exotic Color

0

Welcome to the wild and wacky world of yellow watermelon! If you’re like most people, you’ve probably never heard of this bizarre fruit before. But don’t worry, we’re here to fill you in on all the juicy details.

First things first, let’s address the elephant in the room: what the heck is a yellow watermelon? Well, it’s exactly what it sounds like – a watermelon that is yellow on the outside (and possibly on the inside too).

Aren’t watermelons supposed to be red inside?

Now, you might be thinking to yourself, “But wait, watermelons are supposed to be green on the outside and red on the inside! This is unnatural and must be some kind of genetically modified Frankenfruit!” But fear not, dear reader. Yellow watermelons are actually a naturally occurring variation of the classic watermelon. In fact, they’ve been around for centuries and are native to parts of Africa and Asia.

So why haven’t we heard of these yellow wonders before? Well, it’s probably because they’re not as common as their red-fleshed counterparts. Yellow watermelons are also generally smaller and less sweet than red watermelons, which might make them less appealing to some.

But don’t let that discourage you! Yellow watermelons have their own unique set of benefits. For one, they’re packed with antioxidants and nutrients just like any other watermelon. They also have a slightly firmer texture, which makes them perfect for grilling or adding to salads. And let’s not forget about their vibrant yellow color – they’re sure to add a pop of fun to any fruit platter or summer barbecue.

How does the watermelon get that yellow color?

The Mysterious Yellow Watermelon: Uncovering the Truth Behind Its Exotic Color

Yellow watermelon gets its unique color from a pigment called xanthophyll, which is also found in other yellow fruits and vegetables such as lemons, oranges, and corn. This pigment is produced by the plant as a result of photosynthesis and is responsible for giving yellow watermelon its characteristic hue. In addition to xanthophyll, yellow watermelon may also contain other pigments such as carotenoids, which are responsible for the orange color found in some varieties.

Yellow watermelon is known for its high content of antioxidants and nutrients, and is a good source of vitamins A and C, potassium, and lycopene. It is also low in calories, making it a healthy and refreshing summertime snack.

Now, we know what you’re really wondering: what does a yellow watermelon taste like?

Well, it’s tough to say for sure, as different varieties can have slightly different flavors. Some people say they taste a bit like a honeydew melon, while others claim they have more of a cantaloupe-like taste. But one thing is for certain – they’re definitely not as sweet as red watermelons.

So there you have it, the lowdown on yellow watermelons. If you’re feeling adventurous, give one a try and see for yourself what all the fuss is about. Just be prepared for the inevitable question you’ll get from everyone you meet: “What’s that weird yellow thing you’re eating?” But hey, at least you’ll be able to impress them with your newfound knowledge of this mysterious fruit.


Starbucks’ Medicine Ball: Secret Weapon for Cold and Flu Season

0

As any self-proclaimed Starbucks aficionado knows, the Medicine Ball is not an actual medical remedy, despite its name. Instead, it’s a secret menu item that has taken the coffee chain by storm. So, what exactly is this mysterious elixir that has people lining up for their daily dose?

The Medicine Ball, is a blend of Teavana’s Jade Citrus Mint Green Tea, hot water, honey, and a splash of lemonade. It’s the perfect remedy for a cold or cough, and its sweet and refreshing flavor makes it a fan favorite year-round. Some variations also include a splash of peach tea for an extra fruity kick. Some people like to add a dash of honey ginger syrup for an extra kick of flavor, but it’s completely optional.

But the Medicine Ball isn’t just for when you’re feeling sick. It’s a tasty and healthy beverage to enjoy anytime, especially on a cold day when you need something warm and comforting.

Starbucks’ Medicine Ball has become a cultural phenomenon. Its popularity has spawned countless Instagram posts, memes, and even its hashtag (#medicineball). Some diehard fans have even created their own “prescriptions” for the drink, detailing the exact ratios of ingredients and customization options.

Starbucks' Medicine Ball: Secret Weapon for Cold and Flu Season

So, how do you get your hands on this coveted beverage? Ask your barista for a Medicine Ball, and they should be able to whip one up for you. If you’re feeling adventurous, you can also try ordering a “Honey Citrus Mint Tea” and adding a splash of lemonade to recreate the famous Medicine Ball at home.

The Starbucks Medicine Ball is more than just a drink – it’s a cult classic that has captured the hearts (and taste buds) of caffeine lovers everywhere. It’s the perfect drink to sip on when you’re feeling under the weather or need a little pick-me-up.

According to Starbucks, the drink was created by a barista who was looking for a way to help a customer who was feeling under the weather. The barista combined a blend of tea, honey, and citrus flavors to create a soothing and refreshing drink that was intended to help the customer feel better. The drink became so popular that it was eventually added to the menu at Starbucks locations around the world as the “Honey Citrus Mint Tea.”

So next time you’re at Starbucks, give this drink a try. Trust me, it’s the ultimate feel-good drink. You won’t be disappointed.